When it comes to virtual or artificial assistants, ‘Google Assistant’ is probably the best in the market right now. You might be already using it on your Android phone. Magnificent features of Google Assistant not only surprises you but also it is fun to play with.
Here in the following guide I will show you how you can get the same Google Assistant on your Windows machine. Although there is no fancy UI involved, the experience is just about the same. Yes, you will operate it with a Command Prompt on your Windows PC.

Google made this possible with Google Assistant SDK and the API. You will be installing Google Assistant on Windows PC using Python. So first of all go ahead and download the latest Python version for Windows.
Installing Python on Windows
Step 1: Go to the Python website and download the latest version.
Step 2: Install it using .exe file and don’t forget to add the path in environment variables.
If you are asked to install service pack for Windows then do that also.
Step 3: Open Command Prompt and type “Python” to check if it installed correctly.

If it shows the version as above then it means Python is installed correctly on your PC.
You will need access to Google Assistant API in order to make Google Assistant files work on your PC. So you will have to follow the following steps to configure Google Assistant API using Google Cloud Platform Console.
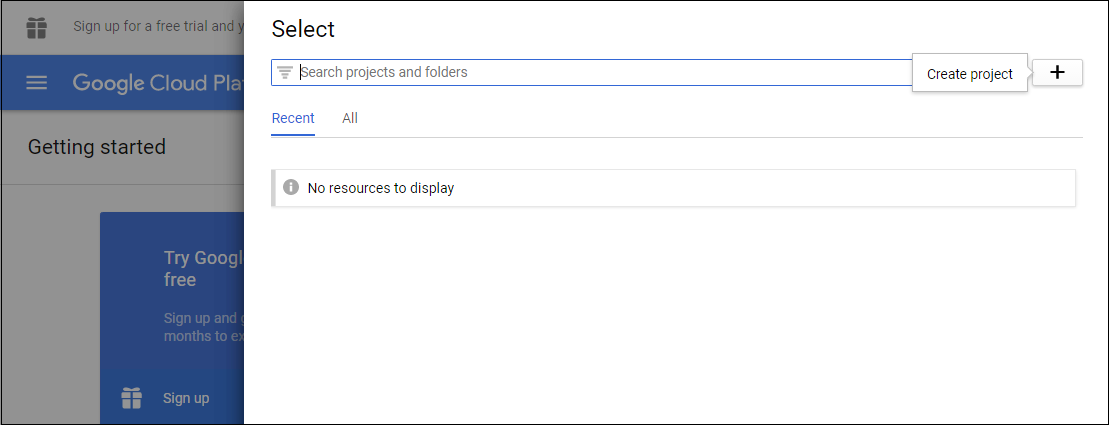
Step 1: Go to Google Cloud Platform Console website and create a new project.
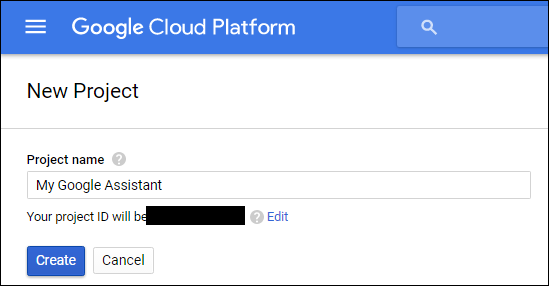
Step 2: Name your project to anything you like. For e.g. “My Google Assistant”
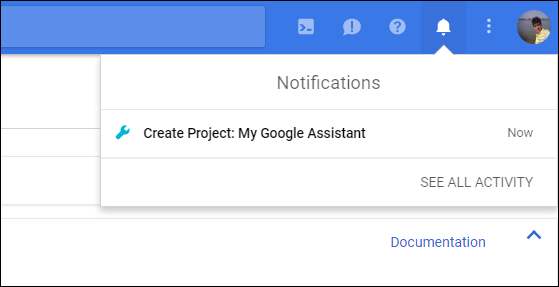
Step 3: It will create a project in few seconds and you will get a notification in a bell icon. Open your project from the notification.
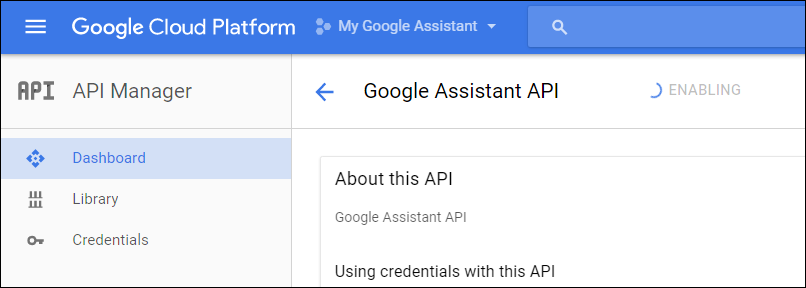
Step 4: Search for “Google Assistant API” from the “API Manager Library” on the left menu and enable it.
Step 5: It will ask you to create credentials to use the API. So click on “create credentials”.
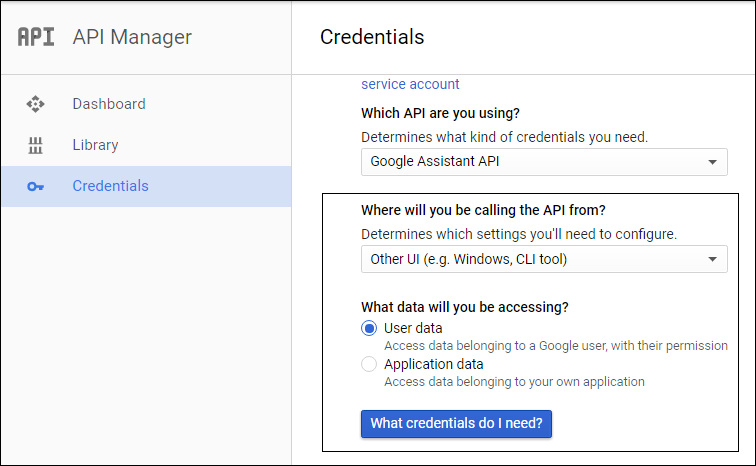
Step 6: You will be asked two questions here. For “Where you will be calling the API from?”, select “Other UI (e.g. Windows, CLI tool)” and for “What data you will be accessing?”, select “User data”. Finally click on “What credentials do I need?”
Step 7: You will be then asked for OAuth 2.0 Client ID. Name it to anything like “your name+desktop” and click on Create Client ID.
Step 8: Write “My Google Assistant” in “Product name shown to users” and click continue.
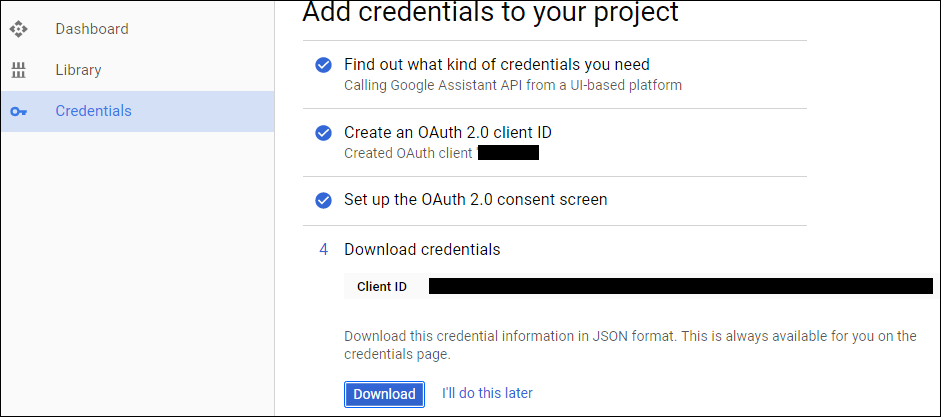
Step 9: Download the credentials to anywhere on your PC and click done. It will download the JSON file which will be required in the later part.
Step 10: Go to Activity Controls of your Google account and turn on all the toggles. It will give more personalized responses.
After this step, you have successfully created the mechanism. Now you can proceed with installing Google Assistant sample project on your PC.
Installing Google Assistant sample project on Windows
Step 1: Open Command Prompt on Windows and type the following command.
py -m pip install google-assistant-sdk[samples]
This will download dependencies which are required to run this Python project. So wait for few seconds and then enter the next command to check the version of the SDK.
Step 2: Check your Google Assistant SDK version that you just installed.
py -m pip show google-assistant-sdk
Ensure that it is the latest 0.3.2 version and then only follow the next commands. You can try the following command to upgrade the SDK version.
pip install –upgrade google-assistant-sdk
If everything is up to date then proceed to step 3.
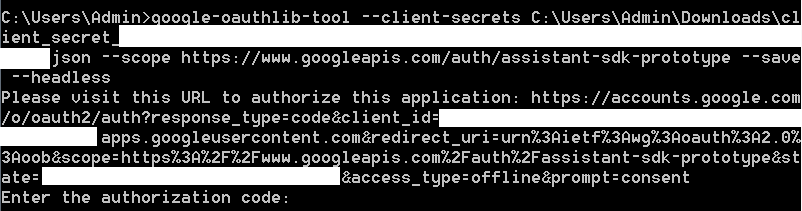
Step 3: Enter the following commands to create test credentials to authorize client i.e. your Windows PC. So that it can call the API on prototyping.
pip install –upgrade google-auth-oauthlib[tool]
google-oauthlib-tool –client-secrets path/to/client_secret_XXXXX.json –scope https://www.googleapis.com/auth/assistant-sdk-prototype –save –headless
Here in the second command replace the “path/to/client_secret_XXXXX.json” with the path of the JSON file which you downloaded above.
Step 4: Copy the URL given in response and paste it in a browser to get the authorization code. You will have to allow the project to access your same Google account.
 Enter the authorization code from the next page to the Command Prompt. Once your credentials are saved, you can get Google Assistant working on your Windows PC.
Step 5: You can record and test 10 seconds of audio using the following command or you can jump to last step to talk to Google Assistant.
googlesamples-assistant-audiotest –record-time 10
Step 6: Talk to Google Assistant using the following command.
googlesamples-assistant-pushtotalk
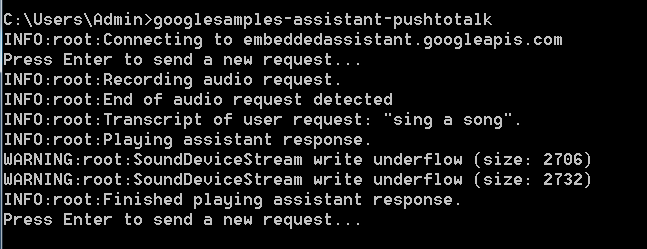
You can now talk to Google Assistant by pressing enter and sending a new request every time. Wait for few seconds and Google Assistant will reply you just the same way as when you use it on Android phone.
It may not respond to all the commands as on Android. However, its fun to see it replying to usual queries like movies near you, petrol stations near you, sing a song and so on.