Ninja Forms is a very useful and popular WordPress plugin for creating contact forms. Some of the WordPress installations gives this plugin already installed in your WordPress. Ninja Forms are easy to integrate and you can create beautiful forms inside your WordPress dashboard.
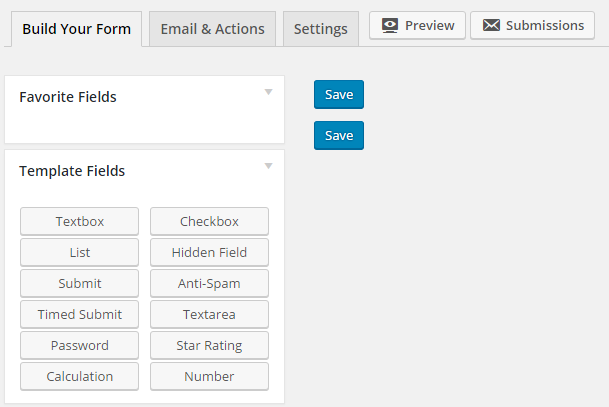
Before Ninja Forms, there were plugins where you had to manually setup SMTP to forward your contact form queries to your email address but with Ninja Forms, its all easy to do. Whenever you create a form with Ninja Forms, you will see the following options.
With the first option, i.e. Build Your Form, you can simply drag the fields which you want to be seen in your contact form. The second option Email & Actions is the important section which you will use to forward your Ninja Forms submissions to email address. Although you will be able to forward submissions to email address, you can check your submissions right from your WordPress dashboard with the submissions option mentioned here. You can not reply them from within the WordPress dashboard and that is why you will have to first forward it to your company or personal email address.
Also see: 4 solid reasons to move from Blogger to WordPress
Basically, you will create actions in Ninja Form. The free version allows you to create actions like email, redirect and success message. We will use “email” to forward first email to the user who has already submitted the query using contact form and the second to yourself on your email address with the user’s query. The first email is the acknowledgement email to the user that we have received your message. Here is a step by step guide on how to send acknowledgement email to the user.
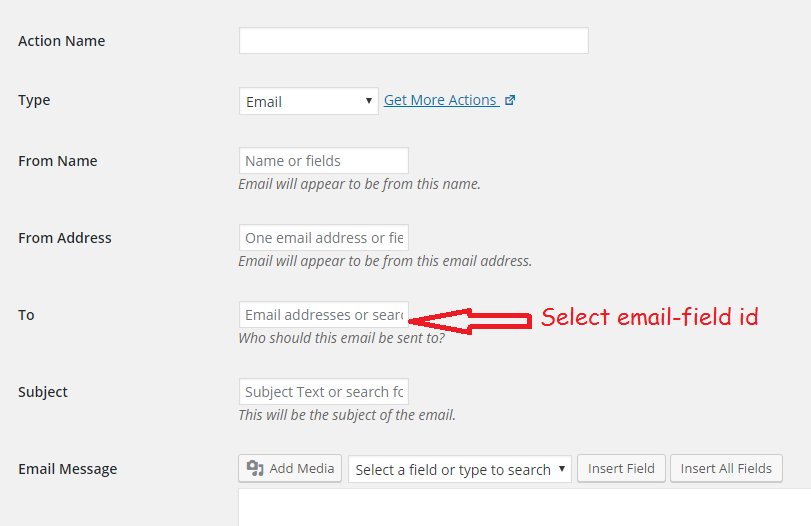
Go to Email & Actions and create new action with the type email. Give this action a name as “email user” or something else which you find appropriate. In the From Name field, write your name or your company name. Similarly, in the From Address, write your personal or company email address. User will be able to see this email address when he receives the acknowledgement email. Next, “To” field is very important. Here select the “email” with the field id of the form which you have built using the first option. Suppose you’ve placed email field on the second position then you will enter “Email-ID:2” here. In the Subject and Email Message field write something like Thank you for contacting and we will get back. So now, whenever user submits any query using the form, he will get an instant reply on his email address.
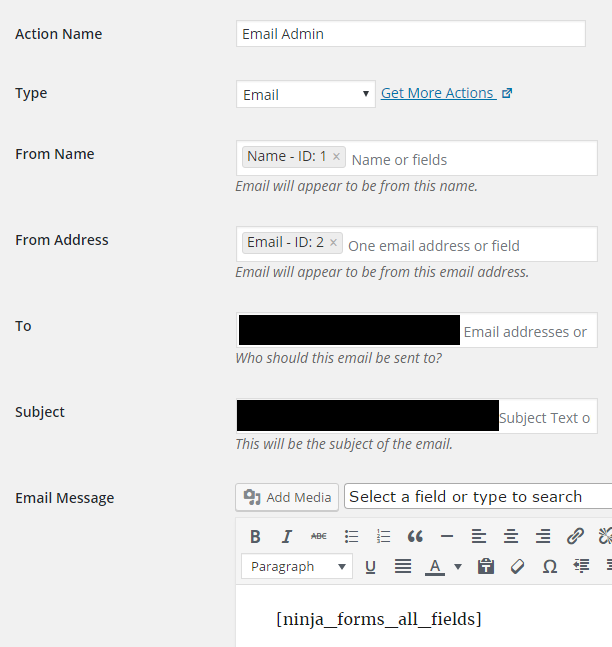
The second email is the email which will be sent to your personal or company email address along with the user’s query. To set this up, create another action with the type email. Give this action a name as “Email Admin” or whatever you find appropriate. In the From Name field, you will select the Name with the field id, so that you can recognize whose query you are reading. Similarly in the From Address field, select user email with the field id. In the “To” field here, write your personal or company email address where you want to receive the email. Write a Subject line and in the Email Message write down the code as mentioned in the form below. This will return all the fields that the user has entered while submitting the form.
After creating this action, you will be able to forward all the messages that are coming from contact form which is created using Ninja Forms. Ninja Forms has many more such actions and you can check them out here.


