Since now SSL(Secure Sockets Layer) being a ranking factor, small publishers like WordPress bloggers are also moving their websites from http to https. This offers more security by protecting the data passed between web servers and browsers.
Although GoDaddy Managed WordPress takes care of most of your technical needs, setting up a free CloudFlare Flexible SSL is bit technical for not so techie people. Hence, I have made this guide to help publishers in setting up it fast and make the most out of it.

So this guide is divided into two parts. The first part will explain you to set up CloudFlare Flexible SSL for your GoDaddy Managed WordPress website (which is very easy). The second part will be the settings that you need to do in order to keep the green signal of SSL running on your website without any mixed content warning. In the end, we will also look at what changes you need to make in your webmaster tools accounts.
Also see: 10 reasons to move to GoDaddy Managed WordPress Hosting
Setting up the ClouFlare Flexible SSL for GoDaddy Managed WordPress website:
Step 1: Create a CloudFlare account.
Step 2: Add a website in ClouFlare account and choose a free plan.
Step 3: Change the DNS Nameservers to CloudFlare Nameservers provided to you. For that you will need to login to your GoDaddy account and then change the Nameservers from Manage DNS option under Domains.
Step 4: Recheck the Nameservers in your CloudFlare account and make sure that your website status is now “Active”.
Step 5: Create a new page rule in CloudFlare account from the page rules section. The first page rule will be http://yourdomain.com and check always use https.
Step 6: Create another page rule with www included and https checked. So this rule will be http://www.yourdomain.com with always use https.
So this makes your website ready to use a free CloudFlare Flexible SSL.
Steps to fix mixed content warning after adding CloudFlare Flexible SSL to GoDaddy Managed WordPress:
As soon as you are done with the above settings, your website may show insecure or mixed content warnings. Although you will see https without green signal on it, its not over yet. There are few settings and plugins which you need to add in order to make it work without any warnings. Lets see how.
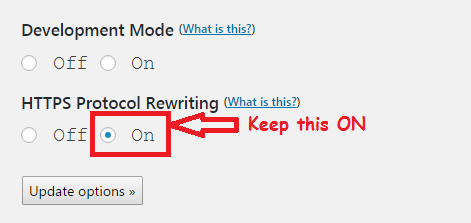
Step 1: Install the official CloudFlare plugin from here and make sure that the last option of HTTPS Protocol Rewriting is kept on. You should now probably see the green signal but its not over yet.
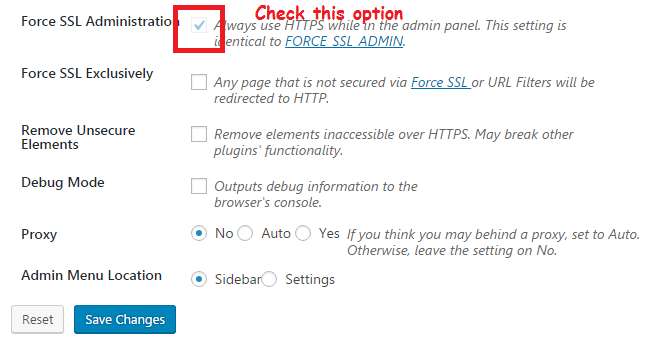
Step 2: Step 1 will show green signal everywhere on your website but another plugin called WordPress HTTPS(SSL) will enforce the SSL in the admin area too. So after installing this keep the Force SSL Administration option checked.
Step 3: Its bit different for GoDaddy Managed platform here as you can not directly edit your WordPress or Site URL from the general settings. Hence, add the following code to your “wp-config.php” file by using any ftp program.
define(‘WP_HOME’,’https://www.yourdomain.com’)
define(‘WP_SITEURL’,’https://www.yourdomain.com’)
add these lines just before authentication unique keys and salts.
Step 4: Install and activate the plugin called Really Simple SSL. This will help to redirect all http traffic to https.
After this step, all your content should be loading without any mixed content warning. If it still shows any warnings then you can add SSL Insecure Content Fixer and activate it. Choose the appropriate settings after activating it.
Tired? Its not done yet.
Next, you will have to add a new property to Google and Yandex Webmaster Tools with your https address. You can keep the Bing Webmaster Tools property as it is as there you need to just add a sitemap with https in it. Now add https sitemap to Google and Yandex Webmaster Tools. Additionally, use the https option to track site visits in Google Analytics.
If you are using Yoast SEO plugin to generate sitemap of your blog or website then you should see it working after this final step.


Ryan
Thanks for the tips on setting up SSL and leveraging Page Rules. We’ve put together some videos covering the rules you reference, along with the most popular/recommended page rules.
https://www.cloudflare.com/features-page-rules/
Also, keep in mind that the number of page rules included with your account varies by plan type. But very soon you will be able to buy additional page rules without changing plans. Stay tuned!
Ritesh Nishar
Hi Ryan,
Thanks for the guide on Page Rules and video tutorials help a lot.